Visual Basic/Windows Dialogs
Windows dialogs are useful when you would like to retrieve information from the user, as in asking where to save a file, letting the user to choose a color or font and what settings to use when printing (copies, what printer to use, ect.). This saves you from a lot of unnecessary work reinventing the wheel - as redesigning and making dialogs can be quite time-consuming - but is also essential in establishing a standard user interface across applications. Standardization of different aspects of the user interface, both in terms of normal widgets as well as common ways of combining them, ensures that applications are intuitive - i.e. that once someone has learned to use an application, this knowledge can be employed to other applications as well.
The easiest way to access these controls is to use a component called Microsoft Common Dialog Control 6.0. To add this component to your project, choose Project - Components, and mark it in the controls list. Subsequently, a new control should appear in your control toolbox. Choose it, and place the control onto your form (note it's only visible in design time).
The control allows the use of the following dialogs. The flags mentioned is different values that can be set to the Flags property, changing the behaviour or design of the different dialogs.
Open and Save dialogs
[edit | edit source]ShowOpen shows a dialog that lets the user choose a drive, directory, file name and file extension to (presumably) open a file.
The save dialog is identical in appearance and function, with the exception of the caption. At run time, when the user chooses a file and closes the dialog box, the FileName property is used to get the selected file name.
Before displaying the dialog
[edit | edit source]Before you can use these dialogs, you must first set the Filter property to allow the user to select a file extension (set default extension using DefaultExt). The filter property is a string with the following structure:
description1|filter1|description2|filter2|
Here, the description is the string that shows up in the list box of all the available filters to choose from. The filter is a file glob expression (otherwise known as a wild card expression) that does the actually filtering, for example, "*.txt", which disallows any file extensions but TXT. It is important to recognize the difference between expressions of this kind and regular expressions which are much more powerful but also more complicated, see Regular Expressions.
Code example
[edit | edit source] On Error Resume Next
' Clear errors
Err.Clear
' Use this common dialog control throughout the procedure
With CommonDialog1
' Raises an error when the user press cancel
.CancelError = True
' Set the file extensions to allow
CommonDialog1.Filter = "All Files (*.*)|*.*|TextFiles (*.txt)|*.txt|Batch Files (*.bat)|*.bat"
' Display the open dialog box.
.ShowOpen
' Ignore this if the user has canceled the dialog
If Err <> cdlCancel Then
' Open the file here using FileName
MsgBox "You've opened '" & .FileName & "'"
End If
End With
Color dialog
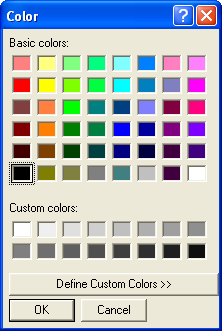
[edit | edit source]The color dialog allows the user to select a color from both a palette as well as through manual choosing using RGB or HSL values. You retrieve the selected color using the Color property.
Code example
[edit | edit source] ' Don't raise errors normally
On Error Resume Next
' Clear errors
Err.Clear
' Use this common dialog control throughout the procedure
With CommonDialog1
' Raises an error when the user press cancel
.CancelError = True
' Set the Flags property.
.Flags = cdlCCRGBInit
' Display the Color dialog box.
.ShowColor
' Ignore this if the user has canceled the dialog
If Err <> cdlCancel Then
' Set the form's background color to the selected color.
Me.BackColor = .Color
End If
End With
Font dialog
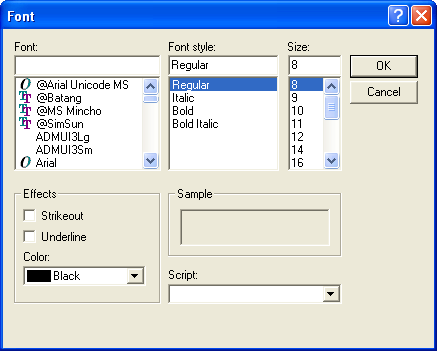
[edit | edit source]The Font dialog box allows the user to select a font by its size, color, and style. Once the user makes selections in the Font dialog box, the following properties contain information about the user's selections.
Properties
[edit | edit source]| Property: | Determines: |
|---|---|
| Color | The selected color. To use this property, you must first set the Flags property to cdlCFEffects. |
| FontBold | Returns whether the bold checkbox was selected. |
| FontItalic | Returns whether the italic checkbox was selected. |
| FontStrikethru | Returns whether the strikethrough checkbox was selected. |
| FontUnderline | Returns whether the underline checkbox was selected. |
| FontName | Returns the selected font name. |
| FontSize | Returns the selected font size. |
Before displaying the dialog
[edit | edit source]To display the dialog, you must first set the Flags property either cdlCFScreenFonts or cdlCFPrinterFonts (or cdlCFBoth, if you intend to let the user choose between both screen fonts and printer fonts).
Code example
[edit | edit source] ' *** This example require a textbox called ''txtText'' to execute properly. ***
On Error Resume Next
' Clear errors
Err.Clear
' Use this common dialog control throughout the procedure
With CommonDialog1
' Raises an error when the user press cancel
.CancelError = True
' Show printer and screen fonts, as well as a font color chooser.
.Flags = cdlCFBoth Or cdlCFEffects
' Display the font dialog box.
.ShowFont
End With
' Ignore this if the user has canceled the dialog
If Err <> cdlCancel Then
' Set the textbox's font properties according to the users selections.
With txtText
.Font.Name = CommonDialog1.FontName
.Font.Size = CommonDialog1.FontSize
.Font.Bold = CommonDialog1.FontBold
.Font.Italic = CommonDialog1.FontItalic
.Font.Underline = CommonDialog1.FontUnderline
.FontStrikethru = CommonDialog1.FontStrikethru
.ForeColor = CommonDialog1.Color
End With
End If
Print dialog
[edit | edit source]The print dialog box allows the user to select how output should be printed. Options and properties accessible to the user includes the amount of copies to make, print quality, the range of pages to print, ect. It also allows the user to choose another printer, as well as configure different settings regarding the current printer.
Properties
[edit | edit source]| Property: | Determines: |
|---|---|
| Copies | The amount of copies to print. |
| FromPage | The starting page of the print range. |
| ToPage | The ending page of the print range. |
| hDC | The device context for the selected printer. |
| Orientation | The page's orientation (as in portrait or landscape). |
Before displaying the dialog
[edit | edit source]Before showing the dialog, feel free to set the appropriate print dialog properties to set the default values to use.
Code example
[edit | edit source] On Error Resume Next
' Variables that holds information regarding the print setup.
Dim BeginPage As Long, EndPage As Long, NumCopies As Long, Orientation As Long, Tell As Long
' Clear errors
Err.Clear
' Use this common dialog control throughout the procedure
With CommonDialog1
' Raises an error when the user press cancel
.CancelError = True
' Display the printer dialog box.
.ShowPrinter
' Ignore this if the user has canceled the dialog
If Err <> cdlCancel Then
' Retrieve the printer settings the user has chosen.
BeginPage = CommonDialog1.FromPage
EndPage = CommonDialog1.ToPage
NumCopies = CommonDialog1.Copies
Orientation = CommonDialog1.Orientation
' Start printing
For i = 1 To NumCopies
' Put code here to send data to your printer.
Next
End If
End With
| Previous: Procedures_and_Functions | Contents | Next: Databases |


