Blender 3D: Noob to Pro/Model a Silver Goblet
|
|
Applicable Blender version: 2.75. |
Basic Shape
[edit | edit source]
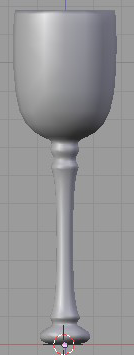
At first glance, the goblet looks like it is composed of cylinders. However, while it is possible to model the goblet with a cylinder mesh, it is easier to make a goblet by using cubes. Cubes make the goblet faster to make and it makes fewer vertices to track. Now, lets start making the basic shape of the goblet.
Start with the default cube and go to Edit Mode ( TAB ). Toggle off "limit selection to visible". Move to the side view ( NUM3 ). Toggle to ortho view. Box select ( B ) the top edges of the cube. Extrude ( E ) upward about one grid square. Hold down CTRL while extruding for incremental movement; by default movement should be restricted to the Z-axis (normal to the selection); if necessary, press Z to toggle this effect. This extrusion is called E1. Repeat 2 more times for extrusion 2 and 3 (E2 and E3).
Now Extrude a longer piece upwards, for the Goblet's stem, of 10 grid squares (E4). Next we will define the area for the 2 top knobs and the bottom of the glass by Extruding upwards 5 more times at 1 grid square each (E5-E9). Next do another upward Extrusion of about 10 grid squares (E10). This is the actual glass itself.
Inflate the Glass
[edit | edit source]
Now, let's begin to inflate the glass. First, clear all selections by hitting the A . Make sure you are still in the side view ( NUM3 ). Box select ( B ) the bottom most cube (all 8 vertices, not just the bottom 4). Then expand it outward by scaling ( S ), then pressing SHIFT + Z to lock/prevent any scaling in height along the Z-axis and finally pressing 4 to quadruple its size. Next, deselect all vertices ( A ), select ( B ) the 4th pair of vertices (E2), scale them ( S ), lock scaling ( SHIFT + Z ) and triple the vertices in size ( S and 3 ).
Do the same for E5 and E7 (the 7th and 9th pairs of vertices, respectively). Then expand ( S and SHIFT + Z ) the top, Goblet rectangle (E9 and E10) to 6 times its current size ( 6 ).
Make the cup's interior
[edit | edit source]

Last is the cup's interior. Once again, you should still be in the side view ( NUM3 ). Box select ( B ) the very top most vertices of the Goblet (E10). Once selected, get a better view by changing to 'Orbit Up' ( NUM8 ). With the top surface selected, initiate an Extrusion ( E ), followed by a termination with the ESCAPE . It will appear as if nothing has happened, but new, overlapping edges have been created and are now selected (this also creates E11). Next Scale ( S ) the selected vertices to 90% of the original size ( .9 ). This creates the inside lip of the cup. Now, Extrude ( E ) the interior lip, along the Z-axis downward ( -10 ) to create the bottom interior of the Goblet (E12). Finish off by selecting all, and then a 'Remove Doubles' ( W → Remove Doubles), for good measure. It should look something like this.
Smoothing and Defining
[edit | edit source]Time to take the mesh and turn it into a proper goblet. Add a subsurf modifier with 3 view subdivisions to the mesh. Change to Object Mode ( TAB ) and select smooth shading. The cube-looking mesh will now look like an object that was created from a cylinder. This has removed all our crisp edges, but our globlet is looking very unstable! Let's rectify things by flattening the bottom.
Noob Note: If your goblet has a bulge in it after applying the subsurf, go to Edit mode ( Tab ), select all ( A ), press W , and select "Remove doubles". (If a menu for boolean operations appears when you hit the W , then you're not in Edit mode; change immediately to Edit mode and try the W again.)
Select the four edges that surround the small circle at the very bottom (the very lowest set of edges) and press SHIFT + E to enable creasing. Now drag the mouse up and down to select the level of the crease. When you're satisfied, hit LMB . Repeat the process for other edges you want to be sharp. I've turned on Draw Creases under Mesh Tools 1 to illustrate which edges have been creased (highlighted yellow) in this example.
That concludes the creation of the goblet. Save the scene for use in the lighting tutorial.
Quick links for the impatient
[edit | edit source]To jump to the relevant lighting section, go to Blender 3D: Noob to Pro/Light a Silver Goblet.
What about applying glass look already? Take a sneak peek at Blender 3D: Noob to Pro/Spin a goblet#Material.


