Cookbook:Dutch Oven
Cookbook | Recipes | Ingredients | Equipment | Techniques | Cookbook Disambiguation Pages | Cookbook equipment

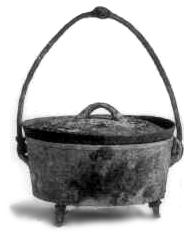
A Dutch oven is a heavy, cast-iron or aluminium pot with a tight-fitting lid. Once heated, it retains heat exceptionally well, making Dutch ovens a good choice for slow-cooked stews. Dutch ovens are one of the best ways to cook over an open fire, and can be used to make a wide range of dishes. While camping, it can be useful to line a dutch oven with aluminium foil, thus saving the job of cleaning it afterwards.
Some Dutch ovens come with a heavy wire stand, instead of cast-in legs, and this has the advantage of other uses around the camp, but if an oven has legs, there is the possibility that a long drop may break off a leg, or worse, drive it up through the bottom, destroying a valuable treasure.
You can put plain potatoes in a Dutch oven and really enjoy the results. Or maybe try some chicken.
Care and feeding
[edit | edit source]A Dutch oven (actually developed in many cultures, but many were imported by the Dutch to the Americas as a trade item) must be seasoned before use, by putting grease or oil (animal or vegetable-anything edible) over the entire inside including the lid and heating to cooking temperature for an hour or so, replenishing the oil as needed, then allow to cool. To clean the oven, wipe the food remnants out of the inside, while still warm, and re-oil. Washing should be done with plain water and a brush. Soap or detergent can remove the seasoning. This is true for any iron cooking surface.
An alternate method of seasoning (the bottom) is to deep fry in it.
Any Dutch oven worth its weight, iron or aluminium, will have a turned up edge on the lid, to keep coals, either wood or charcoal, from dropping into the food, when the lid is removed.
An aluminium pot should be carefully heated: overheating may warp the lid!
Most dishes will do much better, especially breads, when the pot is preheated before adding the food.
Use
[edit | edit source]Heat can be introduced in one of two ways, charcoal briquettes or coals form the fire. Each has their own benefits and drawbacks. Charcoal briquettes provide a consistent heat source that can easily be adjusted for temperature. Charcoal is fairly easy to light and quickly reaches the desired temperature. Each briquette contributes 10-20 degrees to your cooking temperature. Doing some simple multiplication will get you to consistent cooking temps easily. For example a 12 inch oven requires 16 bricks on the top and 8 on the bottom to bake at 350 degrees. The drawback is that you have to carry a bag with you every time you want to cook. Hardwood coals from a camp fire will also work, but its is much harder to control temperature. When baking for example you should put 1/3 of your coals on the bottom and 2/3 on the top. In addition, it takes a large amount of coals to keep several ovens going. It may take an hour or two of a roaring fire to get the desired amount of coals. Also placing the ovens too close to the fire may cause uneven cooking or burning on the sides if not careful.
Cooking times may vary with either method depending on wind or elevation. If you begin to smell the cake it may be time to check the oven.
All the coals should be on the bottom for simple boiling or using the bottom for frying.
The majority of the coals should be on the bottom for simmering a soup or cooking a stew, only about 20% on top.
To roast meats, put equal amounts of coals on top and bottom.
Baking breads and casseroles should have most of the coals on top, about 2/3.
