Creating a Simple 3D Game with XNA/Rendering Your Model
Getting Started
[edit | edit source]First of all, open up Visual c#, and select 'File'/'New Project'. From there select to create a new C# project.

What you should see in front of you are the standard starting XNA starting code. Add the projects 'SkinnedModelPipeline' and 'SkinnedModelWindows' from the previously downloaded skinned model sample, and add a reference to them by entering using SkinnedModel; along with your other using statements and by right clicking on your project and selecting them under 'Add Reference'.

Plus ensure that the class is referencing the 'Game' class as below by changing the first line of your class.
public class ModelRenderer : Microsoft.Xna.Framework.Game
And place the 'SkinnedModel.fx' file from 'SkinnedModelWindows' project into your projects content folder as your model will use it to render.
Fish Renderer
[edit | edit source]Next up, create a new game component file called 'ModelRenderer'. From this, add the following class variables.
public AnimationPlayer animationPlayer; //Controls the animation, references a method in the pre-loaded project
public AnimationClip clip; //Contains the animation clip currently playing
public Model currentModel; //Model reference
public SkinningData skinningData; //Used by the AnimationPlayer method
public Vector3 Translation = new Vector3(0, 0, 0); //Fishes current position on the screen
public Vector3 Rotation = new Vector3(0, 0, 0); //Current rotation
public float Scale = 1.0f; //Current scale
Change the constructor as follows.
public ModelRenderer(Model currentModelInput)
{
    currentModel = currentModelInput;
    // Look up our custom skinning information.
    skinningData = currentModel.Tag as SkinningData;
    if (skinningData == null)
        throw new InvalidOperationException
            ("This model does not contain a SkinningData tag.");
    // Create an animation player, and start decoding an animation clip.
    animationPlayer = new AnimationPlayer(skinningData);
}
This code, more or less taken from original sample, initialises methods which will eventually be used for the animation process.
Next, remove the code from the pre-made update method, and replace it with this.
if ((clip != null))
    animationPlayer.Update(gameTime.ElapsedGameTime, true, Matrix.Identity);
The .Update method here will ensure that the animation currently playing by the method will be played in sequence and in time with everything else using the passed 'gameTime'.
The active ingredient of this class is the below Draw method:
public void ModelDraw(GraphicsDevice device, Vector3 cameraPosition, Vector3 cameraTarget, float farPlaneDistance)
{
    Matrix[] bones = animationPlayer.GetSkinTransforms();
    for (int i = 0; i < bones.Length; i++)
    {
        bones[i] *=
              Matrix.CreateRotationX(Rotation.X) //Computes the rotation
            * Matrix.CreateRotationY(Rotation.Y)
            * Matrix.CreateRotationZ(Rotation.Z)
            * Matrix.CreateScale(Scale) //Applys the scale
            * Matrix.CreateWorld(Translation, Vector3.Forward, Vector3.Up); //Move the models position
    }

    float aspectRatio = (float)device.Viewport.Width /
                        (float)device.Viewport.Height;

    // Compute camera matrices.
    Matrix view = Matrix.CreateLookAt(cameraPosition, cameraTarget, Vector3.Right);

    //Create the 3D projection for this model
    Matrix projection = Matrix.CreatePerspectiveFieldOfView(MathHelper.ToRadians(45.0f), aspectRatio,
        1.0f, farPlaneDistance);

    // Render the skinned mesh.
    foreach (ModelMesh mesh in currentModel.Meshes)
    {
        foreach (Effect effect in mesh.Effects)
        {
            effect.Parameters["Bones"].SetValue(bones);
            effect.Parameters["View"].SetValue(view);
            effect.Parameters["Projection"].SetValue(projection);
        }
        mesh.Draw();
    }
}
We don't need to worry about this too much for the sake of this tutorial.
Add a new method which will be called from the parent file which will call elements of the pre-loaded 'SkinnedModel', playing the animation.
public void PlayAnimation(String Animation)
{
    clip = skinningData.AnimationClips[Animation];
    if (clip != animationPlayer.CurrentClip)
    animationPlayer.StartClip(clip);
}
We will be adding to this code as we extend the logic of the actual gameplay (as its quite a convienent place to store instance variables on the fish we will be using), but for now this more than covers the basics which are needed for the system, and next we can worry about using it to render the model.
Using Your Renderer
[edit | edit source]Create a new folder under 'Content' in your project called 'Models', and add your fish model and all the .tga texture files. Now right click on the 'References' folder, and add 'SkinnedModelPipeline'. This will allow you to select the correct renderer for your model by going into your models properties and changing it to the new 'SkinnedModelProcessor'. If you are unable to select it, ensure that the two 'SkinnedModel' projects are built by right clicking on them and selecting 'Build'.
Now go back to your parent file. Add some new class variable;
ModelRenderer FishMen; //Your new Fish model
Vector3 cameraPosition; //Defines the position of the camera in the 3D space
Vector3 cameraTarget; //Defines your camera target
float farPlaneDistance = 400f; //Defines your plane distance, the higher, the less 3D 'fog' and the more is displayed
And put it into use by going into your update method and adding the line
FishMen.Update(gameTime);
cameraPosition = cameraTarget = FishMen.Translation;
cameraPosition.Z += 20.0f;
at the start of the method, and in the draw method adding
FishMen.ModelDraw(device, cameraPosition, cameraTarget, farPlaneDistance);
after your
GraphicsDevice.Clear(Color.CornflowerBlue);
line.
And finally, add the following in the start of your 'LoadContent' method.
Model currentModel; //Temporary storage for your new model

Content.RootDirectory = "Content";
currentModel = Content.Load<Model>("Models\\FishModel"); //Loads your new model, point it towards your model
FishMen = new ModelRenderer(currentModel);
FishMen.Translation = new Vector3(0f);//Move it to the centre
FishMen.PlayAnimation("Swim");//Play the default swimming animation

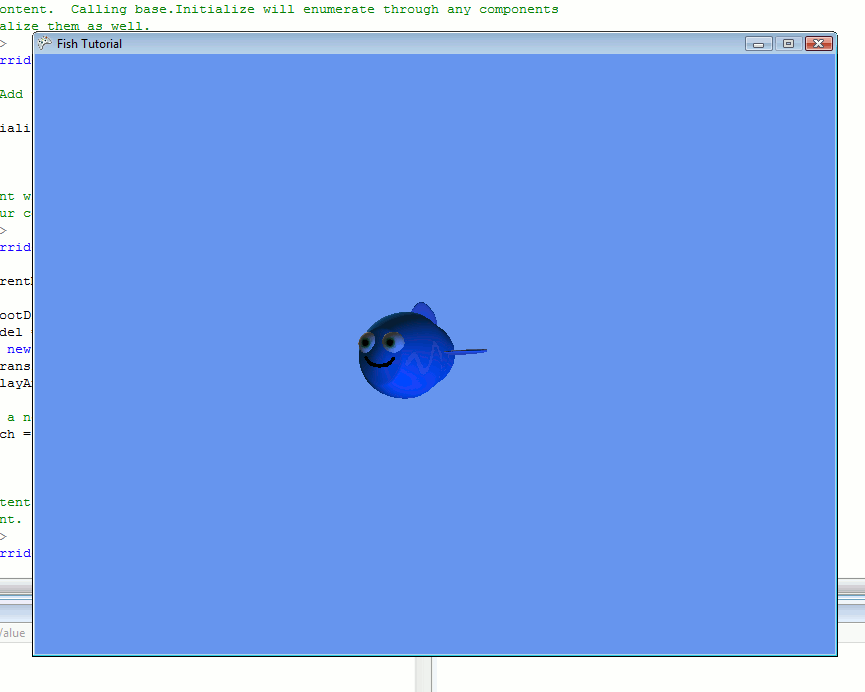
Now, run your application, and everything should work.
