Game Creation with XNA/3D Development/3D Engines
3D Engines
[edit | edit source]Examples for engines allowing to simplify creation of 3D games. Should include a short intro of the engine, its capabilities, its support, maybe example projects that use it. Example for 3D engines can be found here: http://forums.create.msdn.com/forums/t/12882.aspx
QuickStart Engine
[edit | edit source]
QuickStart Engine is a 3D Game Engine for XNA that allows developers to get started with 3D game programming as quickly as possible.[1]
The current version is 0.262. It is still in an beta state. The Engine is published under the Ms-PL, which makes it free to use.
Includes a physics engine, in-game GUI framework, shadow mapping, normal mapping, multi-texture splatting for terrain, and more.
Pre-Requirements
[edit | edit source]- Visual Studio 2010
- XNA Game Studio 4.0
How to get started
[edit | edit source]
The concept of the QuickStart Engine is easy to understand.
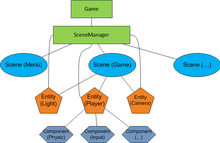
A game is made out of scenes. Those scenes are stored in the SceneManager, which is part of the game class "QSGame". The SceneManager is responsible for loading and holding the current scene.
A scene is made out of entities. Every object in a scene is an entity! It can be a camera, terrain, light, player and anything else.
An entity only contains basic information like position and rotation. To give it something like a model or camera you have to add Components.
Components are bound to entities and are responsible for things like holding the model, handling input or emitting light.
Another important fact is that each entity has to be added manually to the SceneManager of your game!
The engine has also a message system, which allows every part of the game to send and listen to requests. Those requests can include things like a change of the current camera an input or a movement.
How to implement the Engine in your Project
- Go to http://quickstartengine.codeplex.com/ and download the latest version (this tutorial is based on V0.26).
- As you may wish to make changes to the engine (mind the licence!) you should copy the folder "QuickStart Engine v0.26\framework\code" into your project folder.
- For a better understanding rename "code" to something like "QS" or "QuickStart"
- Now open your projects solution file with VS2010
- Open the Solutions-Explorer, right-click your solution and click "add existing project".
- Depending on the platform you are planning to program for, choose from each folder in "QS" the csproj/vsproj-file (if there is no specific Windows/XBox project file take the general one.
- Now do the following in your XNA project
- Go to '<yourXnaGame> -> references' and add references to all projects of your solution
- In the references at 'Content' add "QuickStart_>Windows/XBox>" and "QuickStart.ContentPipeline"
- In your Game.cs ...
- add "using QuickStart;"
- make your game to a subclass of QSGame.
Et voilá! Your game is now based on the QuickStart Engine!
How to Create a Scene:
While the game gets initialised all scenes have to be created and added to the SceneManager. You have to do that in the LoadContent method of your game.
protected override void LoadContent()
{
    base.LoadContent();
    //create and load all scenes here
    Scene newScene = new PlayScene(this);
    Scene anotherScene = new AnotherScene(this);

    this.SceneManager.LoadScene(newScene, true);
    this.SceneManager.LoadScene(anotherScene, true);
    //choose the currently active Scene
    this.SceneManager.ActiveScene = newScene;
}
When a scene gets initialized it can load everything it might need later, including models, textures, images, etc. Although, assets can be loaded at any time if you'd like.
UPDATE: It should be noted that loading entities into your scene has been greatly simplified since this review was originally done. Here's documentation on how to load entities and components without using any C# code, you can now define your entities entirely from XML. http://quickstartengine.codeplex.com/wikipage?title=Creating%20Entities%20and%20Components%20with%20XML
How to Create a Terrain:
This one is a bit tricky.
Make sure to have in your Content folder a "Material\Terrain.qsm". The best is to get the file from the test project, which came with the engine. You can find it at this path: "QuickStart Engine v0.22\framework\test\QuickStartSampleGame\Content\Material".
When you have added the file to the Project, you might have to change the Importer and Processor in Properties to "QuickStart Material Importer/Processor".
We'll have another look at this file later.
To create a terrain you will need a grey scale heightmap. It has to be quadratic and the length of a side must be a power of 2 (2,4,8,16,32,64,...).
Now it is quite easy to create the terrain in a scene:
//create Terrain
Terrain terrain = new Terrain(game, QuickStart.Graphics.LOD.High);
terrain.Name = "MyTerrain";

//set the elevation strength and load the heigtmap
terrain.ElevationStrength = 75;
terrain.Initialize("./Images/heightmap", 1, 4);

//add physic to terrain
PhysicsComponent tf = new PhysicsComponent(terrain, terrain.heightData, terrain.ScaleFactor);
//add the terrain (which is derived from BaseEntity) to the SceneManager of your game
game.SceneManager.AddEntity(terrain);
}
Now there is only one thing missing! You have to add a texture map for your terrain. This map has to be of the same size as the height map and uses three colors to define the textures for the ground.
red   (255,0,0) = rocks
green (0,255,0) = grass
blue  (0,0,255) = water
Have a closer look at the "Terrain.qsm". You will find a path for the "TEXTURE_MAP". Change it to where ever you put your image. To create the map you can use any image processing software. Save it in a lossless format like "png".
How to create an Entity:
Everything in your scene is derived from BaseEntity. Whenever you want to create an object you have to start by creating a BaseEntity-object.
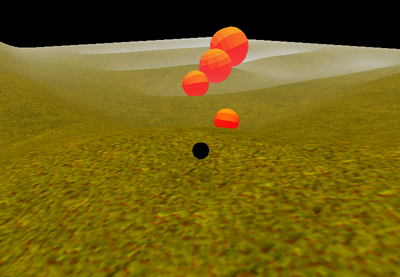
The entity for itself is nothing visible. You have to add a RenderComponent where you set the model and a material. In case you want collision detection and/or physics for your entity you can add a PhysicsComponent. Here is an example for a simple sphere.
//BaseEntity(your game,position, rotation, scale)
BaseEntity sphere = new BaseEntity(this.game, new Vector3(500, 100, 510), Matrix.Identity, 5f);
sphere.Name = "sphere";
//RenderComponent(parent object, path to model, path to material)
RenderComponent r = new RenderComponent(sphere, "Models/unit_sphere", "Material/SimpleColored");
r.modelColor = Color.Orange;
(((Physicscomponent(parent object, type of collider, density, reacts to forces)
PhysicsComponent p = new PhysicsComponent(sphere, ShapeType.Sphere, 5,true);
//add the entity to your games SceneManager
game.SceneManager.AddEntity(sphere);
How to add a third person Camera:
Every object can be used as a camera, which is useful for things like first person views or security cameras.
For the third person view we need a new BaseEntity and add a CameraComponent to it. We also add the ArcBallCameraInputComponent to it, which allows us to rotate the camera later. After this you have to add the camera to the SceneManager, because we have to send some messages, which will just work, when the camera is already known by the game.
BaseEntity cam = new BaseEntity(game,new Vector3(20,0,20),Matrix.Identity,1);
//CameraComponent(object, Field of View,screen width, screen height, near plane, far plane)
CameraComponent camComp = new CameraComponent(cam, 60f, game.Settings.Resolution.X, game.Settings.Resolution.Y, 0.5f, 1000);
//add the input component
ArcBallCameraInputComponent thirdPersonCam = new ArcBallCameraInputComponent(cam);

game.SceneManager.AddEntity(cam);
- The first message is, to say, that this is from now on the main camera
MsgSetRenderEntity RndMsg = ObjectPool.Aquire<MsgSetRenderEntity>();
RndMsg.Entity = cam;
this.game.SendInterfaceMessage(RndMsg, InterfaceType.Camera);
- The second message sets the player object as the parent
MsgSetParent msg = ObjectPool.Aquire<MsgSetParent>();
msg.ParentEntity = playerEntity;
msg.UniqueTarget = cam.UniqueID;
game.SendMessage(msg);
- The third message is to say that the player rotates with the camera
MsgLockCharacterRotationToCamera msg = ObjectPool.Aquire<MsgLockCharacterRotationToCamera>();
msg.UniqueTarget = player.UniqueID;
msg.LockRotation = true;
game.SendMessage(msg);
Finally you have your camera always in a third person view behind your player!
How to create a Character Object
The third person camera has no use as long as we don't have a player. Most of the script you will already recognize from the examples before.
BaseEntity player = new BaseEntity(this.game, new Vector3(500, 100, 500), Matrix.Identity, 1);
player.Name = "player";

RenderComponent comp = new RenderComponent(player, "Models/unit_sphere", "Material/SimpleColored");
//you can set whether an object receives and creates shadows
comp.SetShadowingProperties(true, true);
comp.modelColor = Color.Blue;

//The engine already has special physics and an input component for a player
CharacterPhysicsComponent newPhysComponent = new CharacterPhysicsComponent(player, ShapeType.Sphere, 5.0f);
CharacterInputComponent input = new CharacterInputComponent(player);

game.SceneManager.AddEntity(player);

//Tell the game, that this is the controlled object
MsgSetControlledEntity msgSetControlled = ObjectPool.Aquire<MsgSetControlledEntity>();
msgSetControlled.ControlledEntityID = player.UniqueID;
this.game.SendInterfaceMessage(msgSetControlled, InterfaceType.SceneManager);
How to create a Light:
The last thing we need for a basic scene is a light.
Every Entity can emit light. Therefore you just have to create the lights settings, a LightEmitterComponent and initialise it after adding it to the SceneManager. This could look like this:
BaseEntity light = new BaseEntity(game, new Vector3(0, 500, 0), Matrix.CreateRotationX((float)Math.PI/2f), 1);
light.Name = "light";

LightSettings s =  new QuickStart.EnvironmentalSettings.LightSettings();
s.LightDirection = Vector3.Down;
s.AmbientColor = new Vector4(1f, 0f, 0f, 0f);
s.DiffuseColor = new Vector4(0f, 1f, 0f, 0f);
s.SpecularColor = Vector4.Zero;
s.MinimumAmbient = 50f;
s.SpecularPower = 10f;

LightEmitterComponent lc = new LightEmitterComponent(light, s);
game.SceneManager.AddEntity(light);

lc.InitializeLightDirection();
Review
[edit | edit source]The QuickStart Engine has potential but it takes some time to understand what's going on. In some points it is a bit to static and needs to be improved.
The engine was updated to work with XNA 4.0, also loading of entities and components is much simpler now and can be done entirely through XML. Also other features like texture mapping for models and in-game GUI have been added since this review was done.
References
[edit | edit source]- ↑ http://quickstartengine.codeplex.com/ - homepage of project
Authors
[edit | edit source]juliusse
