Isometric Pixel Art/Making a Box
Appearance
About FAQ Intro 1 2 3 4 5 6 7 8 9 Gallery
's the different methods of making this box. There are a couple different ways of putting it together:
[edit | edit source]- The Puzzle Piece Method (Recommended for this Tutorial): Make the separate lines (the x, y, and z axis) and put them together like a puzzle using copy and paste to duplicate the lines. Good for uniformity and if you aren't making different length of your lines.
- The Line by Line Method: Create each line individually. Good if you don't like using copy and paste or if your shape is not uniform (like a person or animal) but is extremely easy to mess up.
- (Not Recommended for this Tutorial)Pixel by Pixel Method: Pros: Makes for really good quality pictures with unparallel uniformity, if done right. Cons: Takes an extremely LONG TIME.
Math? IN ART?
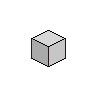
[edit | edit source]That's right! We are going to do a quickly lesson in geometry. For your pixel line lengths, I suggest them being multiples of each other (ex: 2 x 2 = 4; 2 x 3 = 6). This makes it look more like a real cube. Also, we must remember that the lines must be of equal length for it to be a real cube. Isometric lengths make this really hard to do, because each axis has a different scale (ex: The X axis (up and down)compared to the Y axis (left to right)are equal, but they are both different from the Z axis (forward and backward)). Eyeball it and find out what looks right to you.
- The "Golden Rule" of Isometric Pixel Art is that for every 2 pixels in the Z axis (front to back) there is one pixel for the X or Y axis (up and down, left and right). Although this may not always work for every single thing you draw isometrically, it is the general rule so remember it!
Let's Begin!
[edit | edit source]


Congratulations! You've just made your first isometric drawing!
About FAQ Intro 1 2 3 4 5 6 7 8 9 Gallery
