MeGUI/Guides/iPod Conversion Guide/Video
Basic Info
[edit | edit source]This section will walkthrough the encoding of an iPod-compatible video file using either Xvid or x264. You can't just use any settings to encode for the iPod, there are limits as it is a portable device and not capable of everything. Here's a table of the more generic restrictions.
| MPEG-4 AVC | MPEG-4 ASP | |
|---|---|---|
| Bitrate | No restriction | 25000 kbps |
| Frame rate | 30 fps | |
| Profile | Main @ 3.1 | Simple |
| Max resolution (pixels) | 1280 by 720 | 640 by 480 |
| Max 4:3 resolution (pixels) | 960 by 720 | 640 by 480 |
| Max 16:9 resolution (pixels) | 1280 by 720 | 640 by 360 |
| Container | .m4v, .mp4, or .mov | |
According to the table, AVC support is significantly better than ASP, so you are encouraged to use AVC.
Note: In your AVS file you will need to resize your video to iPod Standards. You can go below these standards if you like, but not above.
x264 Preset Setup
[edit | edit source]
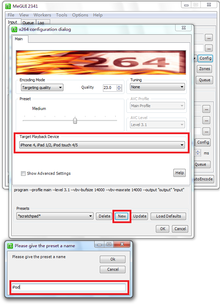
We will set up an encoding preset for convenience.
- Open MeGUI to its main window.
- Select x264: *scratchpad* in the codec drop down list. Click "Config".
- Under Target Playback Device, select iPhone 4, iPad 1/2, iPod touch 4/5 in the drop down list.
- Click "New" under "Presets", type in "iPod".
Encoding
[edit | edit source]Once you have finished creating your presets, you can use them! Return to the MeGUI main window.
- Select your Video Profile first. Use x264: iPod for X264 output.
- Open your AVS script if you have it, and create if not.
- When you are creating the AVS script, you must resize it to 1280 lines, or your iPod will not play it.
- Now, select RAWAVC for your container.
- Calculate your bitrate using Bitrate Calculator. Click "Yes" when asked if you want to copy calculated bitrate into video settings.
- Check that the input AVS script is OK with your iPod. Go to Tools -> AVC Levels Checker.
- If it outputs "This file matches the criteria", then you are good and click "OK".
- If it outputs other things, then there's something wrong. Make sure your source file is less than or equal to 1280 px by 720 px, or make another AVS script using the "Resize" feature in AVS creator.
- Finally, select your Video Output location. Remember that your encoded video will have an extension of ".264".
- Click Queue.
Once you've done this you will need to wait for all the audio and video encoding to finish before you move onto the last step, which is muxing the files together.
