Simulation with AnyLogic/Pedestrian Simulation/Step 3. Adding a passenger flow
Appearance
Step 3. Adding a passenger flow
[edit | edit source]Now we will finish creating the simple model simulating passenger flow. We need to add library objects adding and removing pedestrians from the simulated environment.
Create the model flowchart
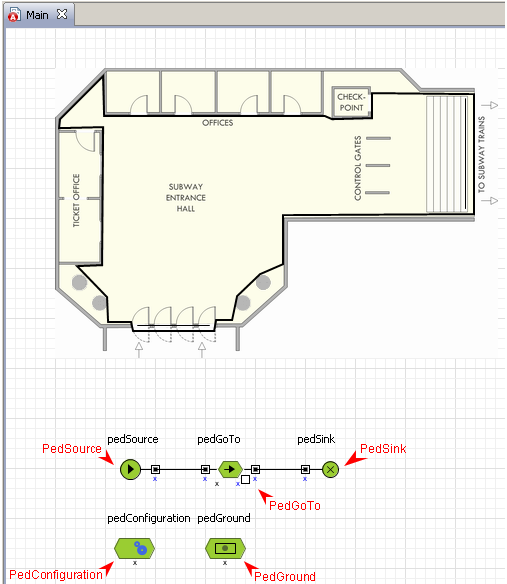
- Create a flowchart describing the process. In AnyLogic you create flowcharts by adding the objects from the library stencil onto the class diagram, setting custom properties for the objects, and connecting objects together. Add Pedestrian Library objects on the diagram and connect them as shown in the figure below:

- To add a library object on the diagram, open the Pedestrian Library palette, and drag the required object from the palette into the graphical editor.
- To connect ports of objects, double-click the first port and then click the second port. The connector linking two ports appears.

Cyan points inside ports indicate the correct connection. In the case you do not see cyan circles, it probably means that you put connector's point close by a port and you need to move it onto it. - Configure the PedGround object. This object allows user to define 2D layer in the simulated environment, representing "ground" for pedestrians, i. e. surface on which pedestrians can walk. Set up the following object properties:

- Set the walls for the floor. In the Walls (group, optional) field type the name of our Use group containing walls polyline drawn earlier for this purpose.
Please refer to Pedestrian Library Reference Guide for the description of all Pedestrian Library objects. To invoke AnyLogic Pedestrian Library Reference Guide, choose the corresponding help topic in the Help window.
- Set the walls for the floor. In the Walls (group, optional) field type the name of our Use group containing walls polyline drawn earlier for this purpose.
- Configure the PedSource object. PedSource object generates pedestrians. It is usually used as a starting point of the pedestrian flow. In our example, it models passenger arrival.
Set the following object properties:
- Specify the PedGround object, defining the ground, to which new pedestrians will be added. In the Arrival ground (PedGround) field type the name of your PedGround object: pedGround.
- Define the place of the ground where the passengers will appear. It can be defined by a line or a polyline. Type entry (the name of the polyline drawn earlier for that purpose) in the Appears at (line, polyline) field. Now passengers will appear at some random point of the entry line.
- Set up the PedGoTo object. This block moves pedestrians from the current location to a new one. We add this object to model how passengers move from the entry to subway trains.
Set the following object properties:
- Specify destination for passengers. When entered environment, pedestrians will go to to the target you specify. It can be defined with a line or with a pixel. At this point we assume that all passengers move directly to subway trains. Specify exit (the line representing the passenger flow exit) in the Target (point,line) field.
- Leave all properties of PedSink object by default. PedSink object disposes incoming pedestrians. It is usually used as an end point of the pedestrian flow.
- Leave all properties of PedConfiguration object by default. This object represents a set of Pedestrian Library’s global parameters and allows tuning the model for a specific task in order to get maximum model performance.


