User:ArdentPerf/TestChap1
- Hardware and Windows Minimum Requirements
- Install VMware Server
- Setup Virtual Networks
- Setup Virtual Storage
- Download Oracle Enterprise Linux
Next: Linux Install
This handbook will walk you through the process of creating a two-node Oracle RAC cluster on your own laptop or desktop computer.
A detailed explanation of virtualization is beyond the scope of this lab but here is a simple overview of what we are building:

Hardware Minimum Requirements
[edit | edit source]Most modern laptop and desktop computers should be powerful enough to run a two-node virtual RAC cluster. In a nutshell, these are the recommended minimums:
- Dual-core 2GHz 32-bit processor (it's been done with single-core)
- 4GB memory (it's been done with 3GB)
- Two physical hard disks - not partitions (it's been done with one)
- External HD for laptops (it's been done with certain USB flash memory sticks)
- 50 GB + 10.5 GB free space (it's been done with slightly less)
- Support files larger than 2GB, e.g. NTFS (it's been done without 2GB file support, on FAT32)
- Windows XP or Vista (Linux & Mac are not directly covered in these instructions, but a supplementary PDF covering VirtualBox can be downloaded)
If your laptop or desktop does not meet these minimum requirements then it is not recommended to try completing the RAC Attack labs. Although it is possible to complete these labs with smaller configurations, there are many potential problems.
| Although we recommend against trying, RAC Attack has been done with: single-core, 3GB memory, one physical hard drive, certain USB flash memory sticks, and less than 60GB of free space. |
Windows Preparation
[edit | edit source]- Reboot windows. After this clean boot-up, don't start any unneeded programs - for example email or instant messenger.
- If possible, disable virus scanning (so that your antivirus software doesn't try to scan I/O on the virtual machine disks).
- Terminate any memory resident programs which are running, especially programs that help big applications "quick-start" (these often use up a lot of memory).
Hardware Verificaton
[edit | edit source]Processor
[edit | edit source]-
From the Start menu, choose or type RUN. In the dialog box that appears, type msinfo32.

-
Select System Summary in the left pane. Scroll down to Processor in the right pane. Verify that you have at least 2 cores and that the speed is at least 2000 Mhz.

Memory
[edit | edit source]-
Scroll down to Memory in the right pane. Verify that Installed Physical Memory is at least 4GB. Also, verify that Available Memory is at least 1.4GB. You can terminate programs which run in the foreground and background to increase the Available Memory.

Hard Disks
[edit | edit source]-
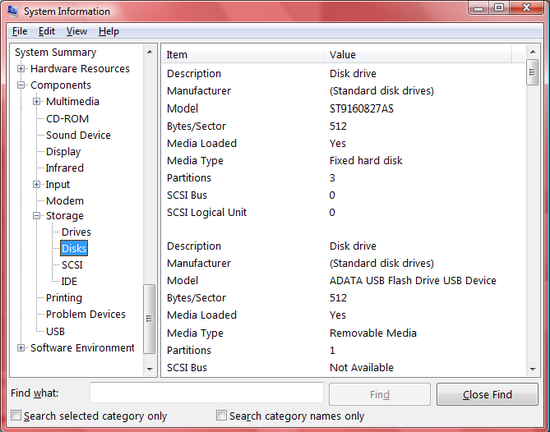
In the left pane, choose Components -> Storage -> Disks. Count the number of Disk Drive entries and verify that there are at least two.

Second Hard Disk
[edit | edit source]| A single hard disk can max out as low as 45 MB/s. (This has been observed during RAC Attack testing.) Typical USB Flash Thumb Drives get very, very poor performance and should not be used. Some USB Flash Thumb Drives are marketed for performance; these typically get a maximum around 30 MB/s. In tests for RAC Attack, USB drives worked well for storing ISO images but somewhat poorly for storing virtual machine files. For a detailed comparison of different connection types, refer to: http://www.pixelbeat.org/speeds.html |
Free Space Requirements
[edit | edit source]RAC Attack is carefully designed to use three directories and spread out I/O for the best possible responsiveness during labs. You can choose how to spread the directories across your hard disks, and the best configuration may vary depending on your connection and storage type.
| Directory Name | Description | Free Space | Suggested Location |
|---|---|---|---|
| RAC11g | Operating System Oracle RAC Software |
50 GB | Second Hard Disk (not flash) |
| RAC11g-shared | Oracle RAC Data | 7.5 GB | Windows Hard Disk* |
| RAC11g-iso | OEL Installation DVD (read-only) | 3 GB | Windows Hard Disk* |
*page file is usually on Windows Hard Disk
Note: do not create the RAC11g directory (with OS and Oracle Software) on a Flash Thumb Drive.
| We worked hard to reduce the footprint of RAC Attack, however with 11gR2 it's very difficult to reduce it beyond this. |
Login Accounts
[edit | edit source]RAC Attack requires a local windows user account with a password and with administrative privileges. You may login using a network or password-free account only if the login account has admin privileges and you know the password for a local account which also has admin privileges (and not an empty password).
If your account is not local, or if your account does not have local admin privileges then you can create an admin account by following the directions here.
Creating a Local Admin Account
[edit | edit source]-
From the Start menu, choose RUN. In the dialog box that appears, type cmd to launch a command prompt.
On Windows 7 find the "search programs" field at the bottom of the Start menu. Type cmd in but don't run it. Right click on "cmd" then choose to "Run as administrator".
After you have opened the command prompt as an admin user, run the following two commands:
net user admin racattack /add
net localgroup administrators admin /add
Login: admin
Password: racattack
Verifying the Login Account
[edit | edit source]-
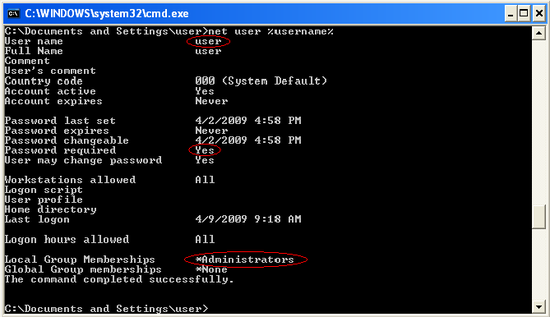
Type net user %username% (if you're using a network or password-free login account then replace %username% with the local password-ed admin account).
VERIFY the username, VERIFY that password required is yes, and VERIFY that local group memberships include Administrators.


