Blender 3D: Noob to Pro/Further Rendering Options
|
|
Applicable Blender version: 2.68. |
In previous units on renderer settings, you learned about
Here we will describe some more renderer settings that can be useful in certain circumstances.
Stamping
[edit | edit source]
The “Stamp” panel in the Render ![]() context provides options for placing descriptive text on top of each rendered frame. The topmost checkbox enables/disables stamping (off by default), while the other checkboxes control the precise information to include, and you can even specify the text and background colour and font size. The information is inserted at the corners of the image, so it can be included in production renders that get appropriately cropped as part of the post-production process.
Note: In blender 2.76, you'll find it under Metadata. You'll have to check Stamp Output.
context provides options for placing descriptive text on top of each rendered frame. The topmost checkbox enables/disables stamping (off by default), while the other checkboxes control the precise information to include, and you can even specify the text and background colour and font size. The information is inserted at the corners of the image, so it can be included in production renders that get appropriately cropped as part of the post-production process.
Note: In blender 2.76, you'll find it under Metadata. You'll have to check Stamp Output.
Toon Renders
[edit | edit source]
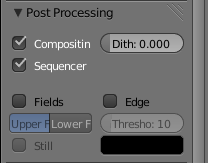
Blender has long had an option for doing simplified “toon” (cartoon-style outlined) renders. In the Render ![]() context, look for the “Post Processing” panel and check the “Edge” box. You will also have to set up the lighting and materials for your objects to give a more flat-shaded look.
context, look for the “Post Processing” panel and check the “Edge” box. You will also have to set up the lighting and materials for your objects to give a more flat-shaded look.
A more powerful set of options for doing this sort of thing is available with Freestyle, which you will learn about later.
Clay Renders
[edit | edit source]There is sometimes a need to render a scene without detailed materials and textures, just to see what the object shapes look like. In the Render Layers ![]() context, there is an option to override all lighting and materials for objects in the layer with a particular light group and a particular material. It is common to use a plain diffuse, colourless grey material for this purpose, making all the objects look like they are made out of clay, hence the name.
context, there is an option to override all lighting and materials for objects in the layer with a particular light group and a particular material. It is common to use a plain diffuse, colourless grey material for this purpose, making all the objects look like they are made out of clay, hence the name.
Transparent Backgrounds
[edit | edit source]Blender by default provides a “sky” or background for your rendered scene; settings for this can be controlled in the World ![]() context.
context.
Sometimes you don’t want such a background at all; you simply want the objects in your scene set against a transparent background. So, for example, if you insert the image in a Web page, the scene is displayed against the page background, rather than its own image background.
The way to do this is quite simple:
- Choose to render the Sky as Transparent. In the Render
 context, look for the Shading panel, where there is a popup menu labelled “Alpha:”, with items “Sky” and “Transparent”. Change this from its default “Sky” to “Transparent”. You have to do this before rendering the image.
 - When saving the rendered image, choose a file format (in the Output panel in the Render
 context) that includes an alpha channel; for example, PNG allows for this, but JPEG does not. With such a format chosen, you further have to remember to select the “RGBA” button, not “RGB”, otherwise the transparent areas will simply be filled with black.
|
If you are not sure which formats support alpha channels: the formats which do not support alpha channels will not show the “RGBA” button. |
