Blender 3D: Noob to Pro/Particle Systems
|
|
Applicable Blender version: 2.66. |
Introduction
[edit | edit source]Particle systems are used to simulate large amounts of small moving objects, creating phenomena of higher order like fire, dust, clouds, smoke, or fur, grass and other strand based objects. You may also use other objects as a visualization of particles.
Before you start with the tutorials, you should at least take a brief overview about the very extensive documentation pages of the particle system. You will find every single parameter explained in the manual if you have the desire to delve deeper ...
Don't forget: particles alone don't do any magic. They are only a placeholder for something nice to view. You have to take care of the visualization also, and that is usually the harder part than to create the particle system.
The very first particle system
[edit | edit source]Creating a particle system
[edit | edit source]

To create a particle system:
- Create a mesh object to be the “parent” (source) of the particles (only mesh objects can emit particles). Let’s use a simple plane to start with.
- select the object
- change to the Particles
 tab in the Object Properties window
 - click on the “+” button (Image. 1a)
Voila, your first particle system (Image. 1b)! It doesn't do anything useful now, but we're going to change that on the following pages.
- To see the particles, you must start the animation running by pressing Alt + A . You will see particles appear and fall from the plane. Press Esc to stop the animation; you return to frame 1. The particle movement is cached (stored), so if you play your animation again it will go faster (well, you won't notice any difference in this simple case).
- If you want to stop the animation in the current frame, press Alt + A while it is running instead of Esc .
- The shortcut for returning to the first frame is Shift + ← )
- To see the particles even better change to wireframe mode ( Z ),
If you change anything in your particle system you always have to return to frame 1, to recalculate the system from the start.
Use the timeline window along the bottom of the screen to change easily between frames.
|
Ultra Physics Coolness: While the animation is running, you can move the objects in the 3D window and the particle system is updated in realtime. The system is not cached then. |
Changing properties of the system
[edit | edit source]
Some important settings, from the “Emission” panel:
- Number: the total number of particles; increase this to 5000
- Start: and End: the start and end frame of the emission
- Lifetime: the lifetime in frames of the particles
And in the “Velocity” panel are settings that combine to determine the initial velocity of the particles:
- Normal: a velocity component in the direction of the face normal (if emitted from faces)
- Tangent: a velocity component parallel to the face
- Rotation: controls the direction of the tangent velocity component
- Emitter Object X/Y/Z: a velocity component oriented in the object’s coordinate system
- Object: a multiplier that imparts some proportion of the object velocity to the particles (try moving the object around with a nonzero value for this field to see its effect)
- Random: a random contribution to the object velocity
Initially, the plane has its face normal oriented upwards. However, it probably looks like the particles are emitted downwards. This is because the initial normal velocity of 1.0 is quite small compared to the force of gravity (which is on by default). Try increasing it to something like 10.0, and when you rerun the animation, you should see the particles rise quite high above the plane before falling down again.
If you render a frame with particles showing, you will see the particles appear as white blobs. This is the default Halo rendering of the particles.
Changing the material of the particles
[edit | edit source]
- Switch the Properties window to the Materials
 tab and create a new material for the plane.
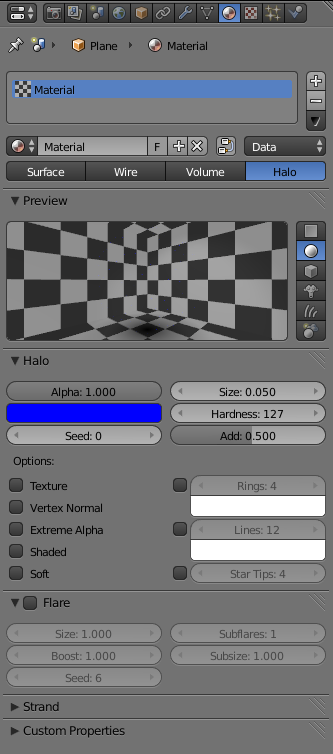
 - Change the material type to Halo. (see also the Manual on Halos). Halos are a post rendering effect, that is applied after the scene is finished. So halos can't shed any lights on other objects, they are not rendered behind RayTransp materials (like glass).

- Set the color to deep blue (RGB: 0/0/1)
- Size: 0.05 so each halo is quite small.
- Hardness: 127 so that each halo has the maximum sharp edge
- Add: 0.5 so that the brightness increases where several halos overlap
Set the world color to black and render (Img. 3b). Nothing special till now, but that will change soon. So proceed to the next page, where we're going to make some fire.
