Blender 3D: Noob to Pro/Simple Vehicle: Seat
|
|
Applicable Blender version: 2.75. |
Techniques
[edit | edit source]You should already know how to:
- Make a mesh
- Navigate the viewport
- Extrusion
- Subsurf
- Crease edges
This section will recap and introduce:
- Loop Cut and Slide (Loop Subdivide)
- Small, consistent vertex movement
The design will be an all-terrain bucket-type seat.
Extrude the Seat
[edit | edit source]
Start in NUM1 view of the default cube and rename it.
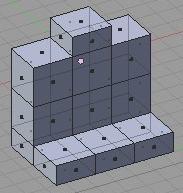
Extrude the cube multiple times to make your basic shape. In this example a 3x3x1 block composes the body with one cube coming out the top for the headrest, and the bottom cube's front faces extruded out to create the seat.
Noob Note: best practice is use "Face" selection mode, select the face, or faces you want to extrude with the RMB , then hit E , select an axis to move on by pressing the X , Y , or Z keys, and pull with CTRL held down.
Add cushion seams
[edit | edit source]
Noob Note: Before starting on this, you'll need to make sure you don't have any unnecessary faces inside the seat, or else you'll get strange cushion seams.
To add a little texture to the mesh, we'll add some cushion seams. Use Loop Cut and Slide ( CTRL + R and you'll see the pink selection loop. You can use the NUM+ key to increase the number of loops made at the same time. Use mouse wheel or press NUM+ 3 times to form 4 loops and LMB the center column of blocks. You may also find it easier to add them one at a time in the correct place, than inserting them and then moving them.
(To get multiple Loops instead of pressing NUM+ just press the number of loops you want in this case NUM4 , this is a fast easy way to achieve this.) You can use a mouse-wheel as well. Finally pres "Enter" 2 times.
Noob note: If the loop comes up with green lines rather than purple you have gone one step too far, just press ESC and try again. When you see the purple lines use your MWH or the NUM+ button.
Position the cushion seams
[edit | edit source]
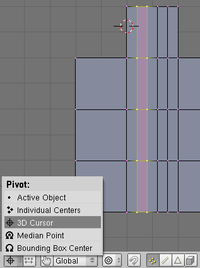
Go into ZX view ( NUM1 ) and make sure the view is orthographic ( NUM5 to activate/deactivate orthographic view). Place the 3D cursor on one of the sides of the head rest ( LMB , or SHIFT + S to move cursor).

The idea is to move the 4 loop cuts just created away from center to the sides. Set the pivot to 3D cursor and select the two closest loop cuts. Scale ( S ) it down on the X axis ( X ) to 0.3. The goal will be to have the loop closer to the cursor to go into the cushion to become a seam. Now, do the same thing for the other side of the head rest.
Noob note: The easiest way to select the two closest loop cuts is to first select ( RMB , SHIFT + RMB ) one edge of each loop, and then go to Select Edge Loop ( SPACE -> Select -> Edge Loop). Or hold down ALT when selecting one of the loop's edges. This should select the entire loop. In order to select more than one loop, hold down SHIFT as well.
Noob2 note: in Ortho view with 'Limit selection to visible' disabled, just box-selected with one drag of the mouse.
Add Depth to the seams
[edit | edit source]
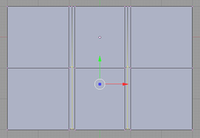
In overhead view ( NUM7 ), select the vertices in vertical parts of the two front facing seams of the seat back, grab them ( G ), move only along the Y axis ( Y ), and type in .05 ENTER .

Switch to NUM3 view and move the vertices in the horizontal parts of the same two seams, grab them and move them down by moving them -0.05 along the Z-axis.
Noob Note: I've found that an easier way to do this is selecting each loop of the seam one by one and scaling to .95 (make sure the pivot is set to "Bounding Box Center)
Subsurf the seat
[edit | edit source]
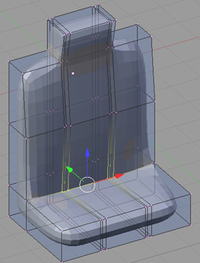
Add a "Subdivison Surface" Modifier to the object. Hit in the Tool shelf: "Smooth" under "Shading" Not Necessary: Select the edges between the back and seat and crease (' SHIFT + E ) them. Crease any edges you feel like to create your perfect jeep seat.
Noob note: it's best to be in Edge select mode when creasing
A subsurf level of 2 or 3 looks best, and don't forget to change the render level to 3 or 4.
Select all ( A ) then either hit the "Set Smooth" button at the bottom of links and materials, or hit W and select "Set Smooth" for a much smoother subsurf.
Noob note: If your seat is noticeably misshapen after adding the subsurf modifier, you may just have to delete internal faces in your model. TAB into edit mode, and hit Z to get into wireframe mode. Click the face select button and look for faces that are totally inside the model. There will probably be a couple vertical faces (in YZ-plane) under the seams in the seat. I found a few elsewhere, also. Deleting all these cleared everything up.
Noob note 2: Another way to remove the extra faces (which can cause the "seams" to be very deep) is to go into edit mode, select your whole seat ( A ), then hit ( W ) and select "Remove doubles" from the menu. This is much quicker than finding them individually, and should solve the problem.
Noob note 3: The problem may also be solved by going into edit mode, using A to select all, and using SPACE > Edit > Normals > Recalculate Outside ( CTRL + N ).
Resize the seat
[edit | edit source]
Next, resize the seat's height and width.
Note: Be sure to change the rotation/scaling pivot back to center point!
To make the whole seat narrower in width, select all A twice, then hit S , followed by X then type 0.8 and press ENTER .

To make the seat back a bit narrower in thickness, select around the seat back (in vertex mode) with the circle select C . Once you have it completely selected on all of the sides, hit S , lock axis with Y , and type 0.75, and hit ENTER .
Final touches
[edit | edit source]This final seat renders to:

Leathery look
[edit | edit source]To give the seams a leathery cord look, Hit A twice to select all, then W and choose Subdivide Fractal on the popup menu (in 2.6x select Subdivide and then press F6 and choose 1 for fractals); just keep the defaults and the seams will look like a bunch of vines until you render it and they look like leather seams, and set in "Material" in the "Properties header" diffuse color to deep black.
More concave
[edit | edit source]
Also the seat can also be made slightly more concave to look like it would hold a person better.
