Blender 3D: Noob to Pro/Simple Vehicle: Rocket Launcher
|
|
Applicable Blender version: 2.75. |
Techniques
[edit | edit source]You should already know how to do:
- Previous Simple Vehicle techniques
This section will recap and introduce:
- UVspheres
- Changing object's center
Overview
[edit | edit source]Two assumptions are going to be made here. One is that the rocket will not be launched in the future (use separate objects if you want to do that). The other is this is going to be a simple design.
If you want to add options to your gun (think sight, trigger), go for it!
Create the Launcher
[edit | edit source]Start a new file and delete the default cube.
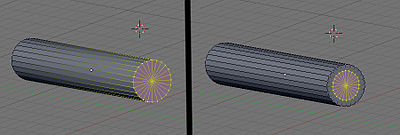
Add a cylinder
[edit | edit source]In NUM1 view, add a cylinder mesh with 24 vertices with "Cap Fill Type" at "Triangle Fan" and set it to "align to view". We'll use 24 because the default 32 is overkill and will only increase rendering time. Rename and elongate the cylinder along the Y axis("S key" then "Y key" then "6key" ). This will be the length of the launcher (minus the rocket).
Hollow the cylinder
[edit | edit source]
Circle Select ( C ) the vertices at one side, then extrude (' E ) them, and press ESC to create a copy of the vertices.
Scale ( S ) them by 0.7.
Do the same at the other side.
Extrude at one side the inner circle vertices ( E ) then "Enter", then press "N key" and change the value at "Z" in 1.2 or -1.2 dependent on what side you take. Then press hit "A key" 'till you have the whole cylinder selected then press "W key" and say "Remove doubles".
Create the rocket
[edit | edit source]For the purposes of this tutorial we will add the rocket on the left end of the launcher.
For a one piece rocket + launcher
[edit | edit source]
Select the inner ring of vertices using circle select ( C )
Extrude ( E ) the "edge" along the Y axis ( Y ) press "Num1" then "S key" then "0.95" select the all the faces second from the outside and press "X" then "Only Faces". Select the inner ring vertices then "E key" "Y key" then "0.5".
Extrude the "edge" along the Y axis with 1.5, and scale the new edge by 1.5.
Extrude the "edge" along the Y axis with 1.
Extrude the "edge" along the Y axis with 3, and scale the new edge by 0.2.
Extrude the "edge", hit ESC , and merge ( ALT + M ) at the center to form the face for the nose
For fun you could extrude the left end of the rocket with -11 in the cylinder and then "F key". you can separate the objects by pressing "P key" after selecting the objects you want to separate. you can manually delete the edges that stayed at the cylinder.
For a two piece rocket and launcher
[edit | edit source]- Method 1: create a cone, rotate it, then extrude and scale to get the rocket shape.
- Method 2: create a cylinder, scale it along the Y-axis, then extrude one side, scale to about 1.3, then extrude two more faces, scaling the first about 0.3 and merging the vertices of the second at center.
- Method 3: Create a UV sphere with 4 rings, and model it - much in the same way as the penguin - into a rocket.
Create the mount
[edit | edit source]Having a launcher is nice, but we'll need to affix it to the jeep somehow. Let's add a mount to the tube.
Make sure you're in edit mode, not object mode!
Add a cylinder
[edit | edit source]
Add a cylinder with 24 vertices with "Cap Fill Type" at "Nothing", since we won't be seeing the ends.
Scale to about 0.55, then move it to the bottom of the tube.
Add a UVsphere
[edit | edit source]
The easiest way to have a wide range of motion for the launcher is to use a ball joint. We can simulate one by just adding a UVsphere. The default 32 segments and 12 rings will be fine. This creates a smooth sphere.
You can think of the number of segments as being the wedges visible when the sphere is viewed as you added it. The number of rings then could be described as the depth of the sphere from that same view.
Resize and place the sphere at the new cylinder arm.
Reposition the center point
[edit | edit source]This next step will be important for continuing the tutorial. Get the 3D cursor to as close to the center of the sphere as possible. While the sphere is still selected after creation, you can press SHIFT + S and snap cursor to selection, putting it in the exact center of the UV Sphere.
Switch to Object Mode. In the "Tool shelf" under "Tools" you'll find the button "Set origin", click this and click on "Origin To 3D cursor" This should move the large pink dot where the cursor is located. This will give it a new center of gravity around the ball joint, making it easy to manipulate later.
Subsurf
[edit | edit source]Be in edit mode!
Apply subsurf, level 2
Select everything ( A twice), and hit the set smooth button ( at the bottom of the links and materials panel).
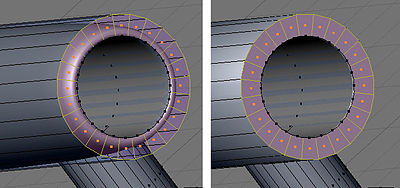
This makes the ends of the rocket launcher tube too rounded, as real ones are squared up.
Square up the tube edges on the right side
[edit | edit source]On the right side (without the rocket sticking out) be in Face select mode

RMB on one of the faces in the outer ring, then circle select ( C ), and select all the faces at the end of the launcher tube. You can also do a lasso selection by CTRL + RMB in face selection mode.
Crease the edges of the faces by hitting SHIFT + E and set it to 1.0.
Squaring up the tube edges on the left side
[edit | edit source]
Now do the left side exactly like the right side.
Noob Note Be sure to deselect everything on the other side first ( A )!!
Squaring up the rocket
[edit | edit source]
RMB on one of the faces in the middle surface, then circle select ( C ), and select the faces all the way around
Crease the edges of the faces by hitting SHIFT + E and set it to 1.0.
Final touches
[edit | edit source]Apply materials or additional items to the object and save for later use.
Do not forget to name the rocket for later use.


